Sunday, February 21, 2010

Studio Redo

In 1986 we built a stand alone garage with a finished room (11 x 22)at the back. It was used for a craft room for a while, then as a catch-all. I moved out and my sister used it for a makeshift greenhouse for several years. When I moved back in with my sister, it was a mess. In the summer of 2008 we revamped the room.

First we had to remove all of the stuff in the room.

My sewing machine is back there somewhere.


Stacks of fabric, unfinished projects. The Santa doll was done many years ago.


I had already moved 3 metal shelves and everything from one of the pink shelves.


More food storage, book shelves.


This is some of what was in the room. We moved it all out to the garage. I tried to sort it as I removed it into categories such as crafts, fabrics, paints, food etc. It was amazing what was stuffed into that room.


I pulled up part of the carpet that was glued to the floor, then built a little shelf to hold the food storage shelves. I then painted the shelves a dark green. It was exterior paint that I found as I was moving stuff out.


As I said, the carpet was glued down. It had a foam backing, and when we pulled it up it left the foam. We tried to scrape it up by hand, no way. So I rented floor scraper. It took me about a hour to scrape a 2x2 foot area by hand. We pulled up the carpet and scraped all the foam up in an afternoon. I love power tools.


Thats my sister, Nyda, in the picture. I didn't get a picture of me in there.
I painted with an warm off white.
We then put in new flooring.


I painted the bookshelves in a lighter green than the food storage. I instaled the bookshelves on the east wall.


Tour of room. East wall. Door to patio and repainted book shelves. We got rid of the record player and most of the records. The rest of the records are behind the doors. I also have my fancy fabrics, laces and some embelishments in boxes behind the doors.


This is the pond to the left outside the east door.


South Wall. Sewing table and ironing board. This winter my feet were cold so I switched them around so my feet were next to the heat! I found these great powerstrips that are almost 3 feet long and attach to the wall. I put them up high enough to get to easy. No crawling under tables.


The rest of the south wall. Bookshelves and craft supplies.
West wall. Food storage wall. Cutting table in middle. Refrigerator and Freezer on North wall.

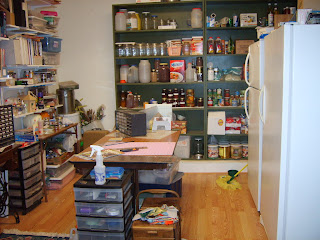


The rest of the North wall. Door to garage and fabric storage. I use the curtains on the fabric storage as a small design wall. When I need more space, I thumbtack a sheet to the food storage shelves.

Wednesday, February 3, 2010

Nine embroidered blocks.

Hi.
I'm interested in crazy quilting. I have been collecting "stuff" for a while now. I also have all the fabric from the last 40 - 50 years of collecting.

In the late 1960's to the 1970's (I'm not sure just when) I made 9 blocks out of "silky" fabrics that Mom had collected. I didn't really know what to do with them, so they got packed away. I kept finding them and then storing them away again. About a year ago, I joined some Yahoo crazy quilting groups. I decided to embelish the blocks with embroidery in the manner of the crazy quilts. I am going to set them together soon and make a quilt. I was frustrated with how flimsy the blocks were. When I posted my concerns, it was suggested that I use a light weight fusable interfacing to strengthen the blocks. It worked very well.

This is the first block.


This is the next block I tried. Each quarter has different flowers but all in red.


Here is the third one. Each quarter has a different trellis pattern.


The next block. I didnt know what to do with the small triangles. I get clipart from Dover every week. I was browsing through the items I had saved and found some patterns that I kind of liked. I just used part of several patterns. I used a varigated pink floss for all the embroidery.


This block is simple, but I think the pattern is effective.


I'm not real happy with this block. The picture doesn't show the detail very well. The Chinese butterflies don't show up very well and the vines in the center cross are not showing up well either.


I like the way the grape vines worked out on this block. I used a different varigated color for each quarter. Lots of french knots!


It took me a while to decide what to do on this block. The red and green plaid was overwhelming. Then I decided to do a Scotish Thistle. There are two small ones and one large one in each quarter. Click on the picture to see the larger photo. Each of the thistle flowers has a base woven in two colors of green.


This is the last block. The center is a flower garden. I tried a lot of different flowers and techniques on this one. When I set the blocks together, I think this will be the center one.

Tuesday, February 2, 2010

A little about me.

Hi! My name is Susan Ovard. I live in southeast Idaho, just north of Idaho Falls. My sister and I share a home out in the country. We have two ponds, a lot of trees, a good garden spot, and a homemade greenhouse. We also share with my Lhasa Lily, my sisters doberman Dizzy, and the cat Scamp.

I'm in my late 50's. Mom taught me how to sew when I was about 7 years old. I think it was in self defense. I was ill in the second grade and was home half days and later could not go out and play a lot. So Mom first taught me some simple embroidery stitches and basic hand sewing. My Barbie doll had a LARGE wardrobe(LOL). Later she taught me how to sew on the sewing machine.

Besides embroidery, sewing, and quilting, I do a lot of other crafts. I also do cross stitch, knitting, crochet, etc.

As time goes on, I will post pictures of my quilts and crafts.


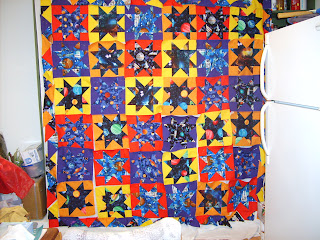
Above is a picture of my last quilt as I was deciding where to put each block. If you look closely all the stars are of a "space" themed fabric. It is actually leftovers from another quilt. I used the space fabric for the windows of the Attic Windows quilt pattern. I'll Post a picture later.

My design wall is a sheet thumbtacked over the food storage I share my "Studio" with.
You can see the extra fridge to the right in the picture.

I'll post the story of the studio redo later.
By for now.

Monday, February 1, 2010

My first post.

I'm trying to figure out how to setup a blog. I want to be able to show my needlework with friends and family.